
Key takeaways
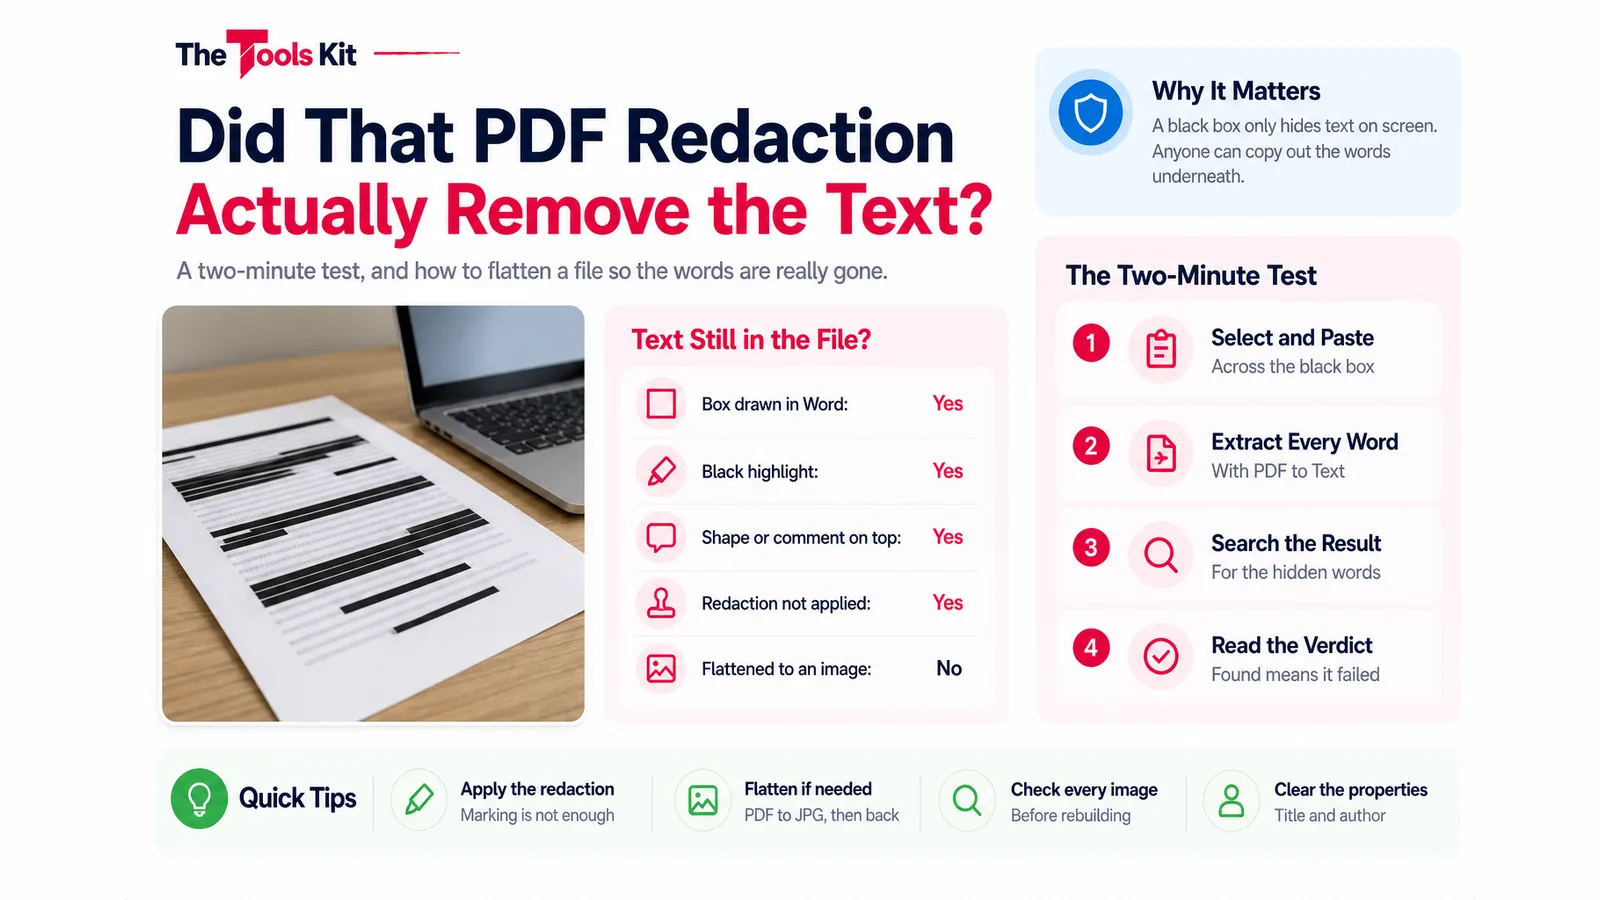
- A black box, highlight or shape drawn over PDF text only hides it on screen; the words usually stay in the file and can be copied out.
- Test every redacted PDF by extracting its text and searching for the hidden words; if any appear, the redaction failed and needs fixing.
- Fix a failed redaction by applying a real redaction in an editor, or by flattening pages to images and rebuilding the PDF from them.
- Flattening removes selectable text and accessibility and makes the file larger, so use a proper redaction tool when the text must stay searchable.
A PDF redaction only works if the hidden words are deleted from the file, not just covered. A black rectangle drawn over a line of text hides it on screen, but the text underneath is usually still there, and anyone can copy it out or pull it with a text extractor. To check, run the redacted PDF through a text extractor and search the result for the words you meant to hide. If they appear, the redaction failed. To fix it, flatten the pages into images and rebuild the PDF, or apply the redaction properly in an editor that deletes the text.
This guide covers why covered text survives, the two-minute test, and a free way to flatten a file in your browser without uploading it anywhere.
Why a black box does not remove anything
A PDF page is built in layers. The text is stored as characters with positions, and shapes, highlights and comments are drawn on top. When you add a black box in a word processor, a black highlight in a PDF viewer, or a filled rectangle comment, you add one more layer. The characters below are untouched. The page looks redacted when printed or viewed, but the file still carries every word.
The same is true of a redaction that was marked and never applied. Dedicated redaction tools work in two steps: first you mark the areas, then you apply the redaction, which deletes the content under the marks. Until the second step runs and the file is saved, the marks are just boxes. A file saved between those steps looks finished and is not.
The two-minute test
Run this on every redacted PDF before it leaves your hands, including files someone else redacted for you.
- Open the PDF in a viewer and drag-select across a blacked-out area, then paste into a plain text editor. If the hidden words paste, the redaction failed. Some viewers block selection, so do not stop here if nothing pastes.
- Extract every word. Drop the file into our PDF to Text tool. It reads the text layer of every page in your browser, so the file is not uploaded, which matters for a document you are redacting in the first place.
- Search the result for the names, numbers or phrases you meant to hide. Use your browser's find (Ctrl+F or Cmd+F) on the extracted text, or download the .txt and search it.
- Read the verdict. If any hidden word appears, the redaction is cosmetic. If none appear but the rest of the page text does, the redaction removed the content. If the tool reports that no selectable text was found, the file is already image-only, so there is no text layer to leak.

How to fix a redaction that failed
You have two routes. Which one fits depends on whether the recipient needs to select or search the text.
Route 1: apply a real redaction
If you have a PDF editor with a redaction feature, mark the areas again and make sure you run the apply step, then save under a new name and repeat the two-minute test on the new file. This keeps the rest of the document as selectable text, which is better for screen readers and for anyone who needs to search it.
Route 2: flatten the pages into images
If you do not have a redaction tool, flattening works with free browser tools. Turning each page into a picture throws the text layer away, so only what is visible survives.
- Convert the PDF with PDF to JPG. Choose Standard quality for documents read on screen or High for documents that will be printed. Each page becomes one JPG, named with its page number.
- Look at every image before going on. If a black box is missing and the hidden text shows in the picture, that box was a redaction mark that was never applied. Cover the area again in an editor first, then convert again.
- Rebuild the file with JPG to PDF. Add the page images in page order; each image becomes one page and the result downloads as a new PDF.
- Run the new file through PDF to Text. It should report that no selectable text was found. That message is what you want here.
Both tools run in your browser, so the original and the images never leave your device.
What flattening costs you
Flattening is thorough, and it has trade-offs worth knowing before you send the file.
- No selectable text. The recipient cannot copy, search or have a screen reader read the pages. If the document must stay accessible, Route 1 is the better choice.
- A bigger file. Pictures of pages take more space than text. If the result is too large to email or upload, our guide to reducing PDF file size for email and upload limits covers the options.
- Different page size. The rebuilt pages take their size from the image pixels, so they are larger than the original paper size. They look the same on screen, and printing with the fit-to-page option handles it.
- Fresh document properties. The rebuilt PDF is a new file, so the original title and author fields are not carried over. That is usually a bonus when you are redacting.
Other places a PDF leaks information
The visible page is not the only thing a PDF carries. Before sending a sensitive file, check the document properties, where the title, author and subject fields can hold a name or a project code; our PDF metadata editor shows and edits those four fields. Also check for comments and form field values, which some viewers hide in a side panel, and for images on the page that carry their own embedded data. Photos taken with a phone are the usual case, and stripping EXIF and GPS data from photos explains what they hold and how to remove it.
A short routine to keep
Redact, apply, save under a new name, extract the text and search it, then send. The test takes less time than writing the covering email, and it is the only step that tells you what the recipient will actually be able to read.
Frequently asked questions
Often, yes. If the black box was drawn on top of the text, the words are still stored in the file and can be copied out or pulled with a text extractor. Only a redaction that deletes the text, or flattening the page into an image, removes it.
Extract the text of the whole file with a PDF to text tool and search the result for the words you meant to hide. If they appear, the redaction only covered them. If they are missing while the rest of the text is there, the redaction removed them.
It removes the text layer, so covered words cannot be copied out. Check every page image before rebuilding the PDF, because a redaction mark that was never applied may not show up as a black box in the image, leaving the text visible.
No. It reads the PDF in your browser and nothing is uploaded, which is why it suits a document you are redacting. The PDF to JPG and JPG to PDF tools also run entirely in your browser.